Behavioral Patterns
Behavioral patterns take care of effective communication and the assignment of responsibilities between objects.
Strategy Pattern
Section titled “Strategy Pattern”This pattern defines a family of algorithms, encapsulates each one of them, and makes them interchangeable within that family
The Strategy Pattern is a behavioral design pattern that enables selecting an algorithm’s behavior at runtime.
Problem
Section titled “Problem”Here, Client is directly interact with the Abstraction, so we cannot modify or change the strategy at the run time, Because it is closely coupled with the interface
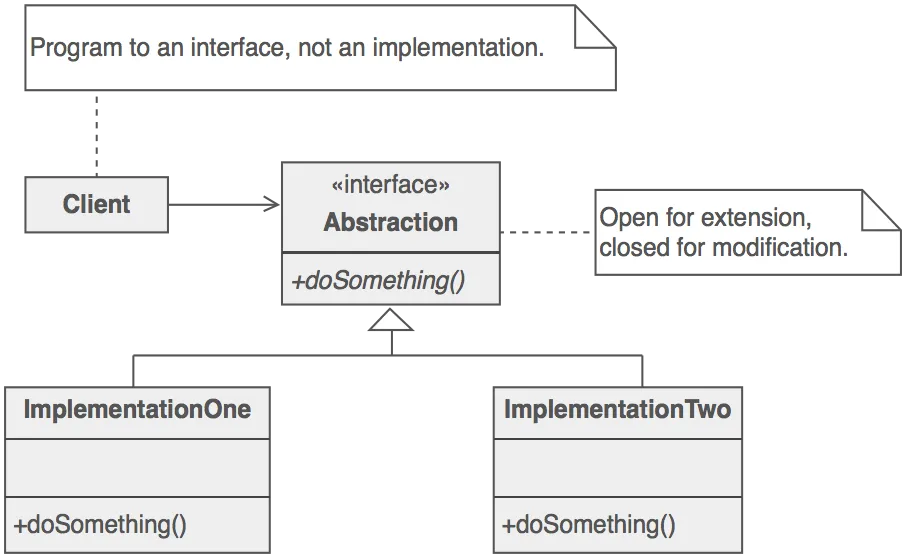
Solution
Section titled “Solution”Here we are separated the client and the Interface with the driver class or context class, it will provide the flexibility to change the strategy at run time
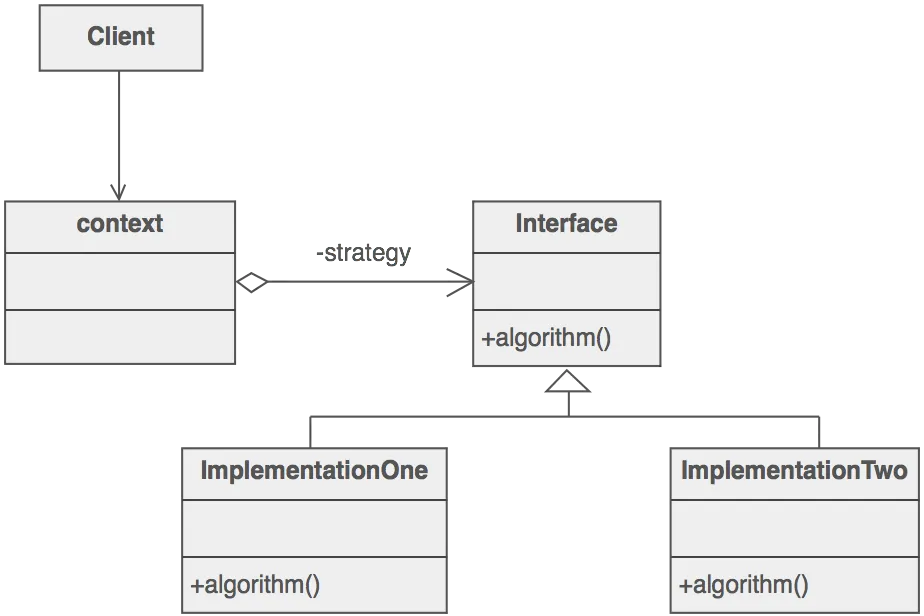
Key Concepts
Section titled “Key Concepts”- Context: The class that uses a Strategy.
- Strategy: The common interface for all supported algorithms.
- Concrete Strategies: Classes that implement the Strategy interface with a particular algorithm.
Examples
Section titled “Examples”// Strategy Interfaceinterface PaymentStrategy { void pay(int amount);}
// Concrete Strategiesclass CreditCardPayment implements PaymentStrategy { private String name; private String cardNumber; private String cvv; private String expiryDate;
public CreditCardPayment(String name, String cardNumber, String cvv, String expiryDate) { this.name = name; this.cardNumber = cardNumber; this.cvv = cvv; this.expiryDate = expiryDate; }
@Override public void pay(int amount) { System.out.println(amount + " paid with Credit Card"); }}
class PaypalPayment implements PaymentStrategy { private String emailId; private String password;
public PaypalPayment(String emailId, String password) { this.emailId = emailId; this.password = password; }
@Override public void pay(int amount) { System.out.println(amount + " paid using Paypal"); }}
// Contextclass ShoppingCart { private PaymentStrategy paymentStrategy;
public void setPaymentStrategy(PaymentStrategy paymentStrategy) { this.paymentStrategy = paymentStrategy; }
public void checkout(int amount) { paymentStrategy.pay(amount); }}
// Usage:ShoppingCart cart = new ShoppingCart();
PaymentStrategy creditCardPayment = new CreditCardPayment("John Doe", "1234567890123456", "123", "12/25");cart.setPaymentStrategy(creditCardPayment);cart.checkout(100); // Output: 100 paid with Credit Card
PaymentStrategy paypalPayment = new PaypalPayment("john.doe@example.com", "password");cart.setPaymentStrategy(paypalPayment);cart.checkout(50); // Output: 50 paid using PaypalBenefits
Section titled “Benefits”- Flexibility: New algorithms can be introduced without changing the context.
- Separation of Concerns: The algorithm implementation is separated from the context.
- Open/Closed Principle: New strategies can be introduced without modifying existing code.
[!tip] Main Problem to address the statergy pattern It can change the statergy at the run time, it gives the flexibility and code modularity and minimise the coupling
Observer Pattern
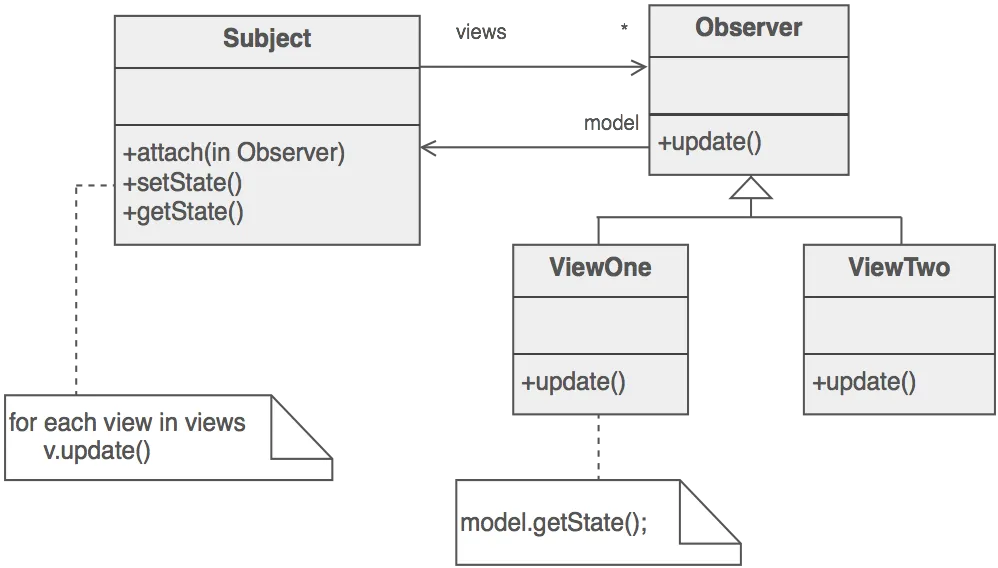
Section titled “Observer Pattern”Define a one-to-many dependency between objects so that when one object changes state, all its dependents are notified and updated automatically.
Problems
Section titled “Problems”- Event Handling Systems: User interface elements need to respond to user actions.
- Data Models and Views: When the data model changes, the views displaying this data must be updated.
- Logging Services: Multiple logging services need to capture and process events from a central event source.
- Distributed Systems: Different components need to stay in sync with changes happening in other components.
[!note] Problem with Traditional Approach In a traditional approach, notifying individual components directly becomes increasingly challenging as the number of components grows. This leads to several issues:
- Scalability: Manually managing notifications to a growing number of components becomes impractical and error-prone.
- Tight Coupling: The primary class responsible for the notifications becomes tightly coupled to all the components it needs to notify, making the system less flexible.
- Maintenance Overhead: Adding, removing, or modifying components requires changes in the primary class, leading to higher maintenance costs and potential for bugs.
Code Implementation
Section titled “Code Implementation”Step 1: Define the Observer Interface
Section titled “Step 1: Define the Observer Interface”public interface Observer { void update(String news);}Step 2: Create Concrete Observers
Section titled “Step 2: Create Concrete Observers”public class EmailSubscriber implements Observer { private String name;
public EmailSubscriber(String name) { this.name = name; }
@Override public void update(String news) { System.out.println(name + " received news update via email: " + news); }}
public class SmsSubscriber implements Observer { private String name;
public SmsSubscriber(String name) { this.name = name; }
@Override public void update(String news) { System.out.println(name + " received news update via SMS: " + news); }}Step 3: Define the Subject Interface
Section titled “Step 3: Define the Subject Interface”import java.util.ArrayList;import java.util.List;
public interface Subject { void addObserver(Observer observer); void removeObserver(Observer observer); void notifyObservers();}Step 4: Create the Concrete Subject
Section titled “Step 4: Create the Concrete Subject”public class NewsAgency implements Subject { private List<Observer> observers = new ArrayList<>(); private String news;
@Override public void addObserver(Observer observer) { observers.add(observer); }
@Override public void removeObserver(Observer observer) { observers.remove(observer); }
public void setNews(String news) { this.news = news; notifyObservers(); }
@Override public void notifyObservers() { for (Observer observer : observers) { observer.update(news); } }}Step 5: Use the Observer Pattern
Section titled “Step 5: Use the Observer Pattern”public class ObserverPatternExample { public static void main(String[] args) { NewsAgency newsAgency = new NewsAgency();
Observer emailSubscriber = new EmailSubscriber("Alice"); Observer smsSubscriber = new SmsSubscriber("Bob");
newsAgency.addObserver(emailSubscriber); newsAgency.addObserver(smsSubscriber);
newsAgency.setNews("Breaking News: Observer Pattern in Java!");
newsAgency.removeObserver(emailSubscriber);
newsAgency.setNews("Another News: Observer Pattern example completed!"); }}Explanation
Section titled “Explanation”- Observer: Defines an interface for updating objects.
- EmailSubscriber and SmsSubscriber: Implement the Observer interface to handle updates.
- Subject: Defines an interface for attaching and detaching observers.
- NewsAgency: Implements the Subject interface and notifies observers of state changes.
- ObserverPatternExample: Demonstrates how to use the Observer Pattern by creating a news agency and adding/removing observers.
Benefits
Section titled “Benefits”- Loose Coupling: The news agency (subject) doesn’t need to know the details of its subscribers (observers).
- Dynamic Relationships: Subscribers can be added or removed at runtime.
- Separation of Concerns: The news agency focuses on publishing news, while the observers handle the notifications.
- Scalability:
State Pattern
Section titled “State Pattern”The State Pattern allows an object to change its behavior when its internal state changes. It provides a way to manage different behaviors based on the object’s state.
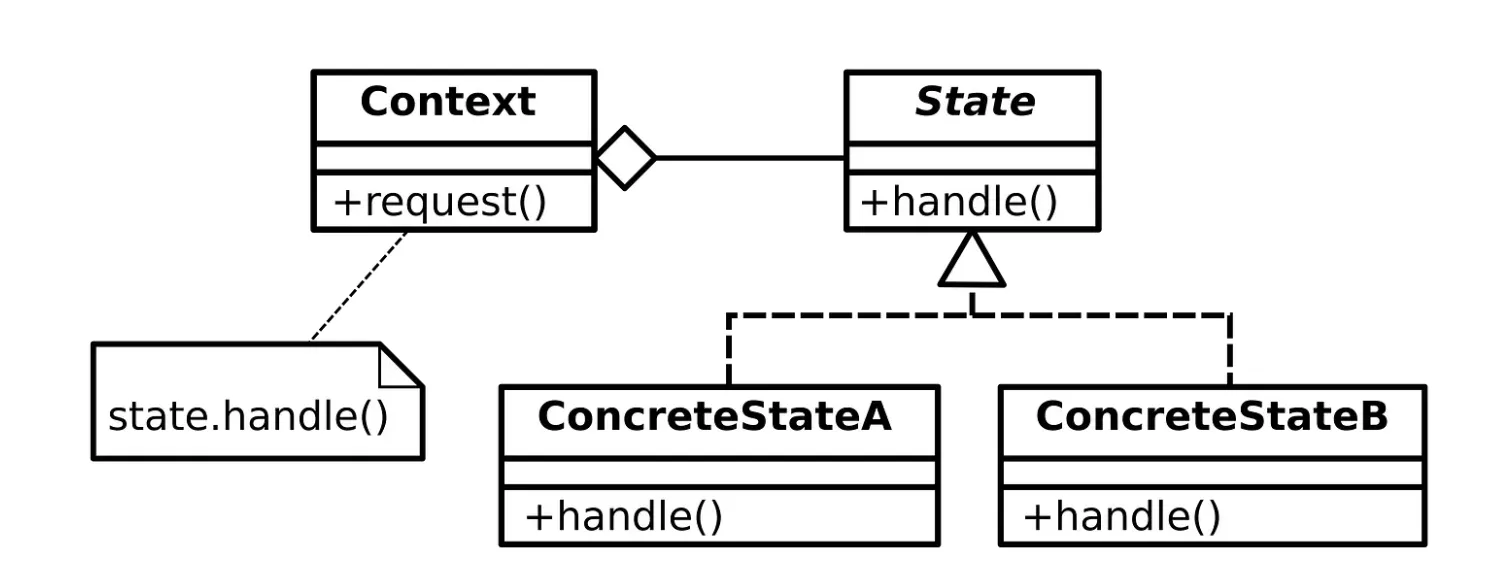
Problem it solves
Section titled “Problem it solves”- Complex Conditional Logic: It eliminates large if-else or switch statements by encapsulating state-specific behavior in separate classes, making the code easier to read, maintain, and extend.
- Code Duplication: It centralizes state-specific behavior in dedicated classes, reducing duplication and ensuring changes are made in one place.
- Tight Coupling: It decouples the context object from state-specific logic, allowing new states to be added or modified without affecting the context class.
Example for the Bad code
Section titled “Example for the Bad code”// Bad Implementation: Vending Machine with if-else logicpublic class VendingMachineBad { private String state; // State is represented as a String
public VendingMachineBad() { this.state = "NoCoin"; // Initial state }
public void insertCoin() { if (state.equals("NoCoin")) { System.out.println("Coin inserted. Machine is ready to dispense."); state = "HasCoin"; } else if (state.equals("HasCoin")) { System.out.println("Coin already inserted. Ready to dispense."); } else if (state.equals("Dispensed")) { System.out.println("Please wait. Resetting the machine."); } }
public void dispenseItem() { if (state.equals("NoCoin")) { System.out.println("Insert a coin first."); } else if (state.equals("HasCoin")) { System.out.println("Item dispensed. Thank you!"); state = "Dispensed"; } else if (state.equals("Dispensed")) { System.out.println("Item already dispensed. Insert a new coin."); state = "NoCoin"; } }}
// Client Codepublic class BadStateExample { public static void main(String[] args) { VendingMachineBad machine = new VendingMachineBad();
// Test the vending machine machine.dispenseItem(); // Output: Insert a coin first. machine.insertCoin(); // Output: Coin inserted. Machine is ready to dispense. machine.insertCoin(); // Output: Coin already inserted. Ready to dispense. machine.dispenseItem(); // Output: Item dispensed. Thank you! machine.dispenseItem(); // Output: Item already dispensed. Insert a new coin. machine.insertCoin(); // Output: Please wait. Resetting the machine. }}Example for the Good code
Section titled “Example for the Good code”// State Interfaceinterface State { void insertCoin(VendingMachine machine); void dispenseItem(VendingMachine machine);}
// Concrete State: No Coin Stateclass NoCoinState implements State { @Override public void insertCoin(VendingMachine machine) { System.out.println("Coin inserted. Machine is ready to dispense."); machine.setState(new HasCoinState()); }
@Override public void dispenseItem(VendingMachine machine) { System.out.println("Insert a coin first."); }}
// Concrete State: Has Coin Stateclass HasCoinState implements State { @Override public void insertCoin(VendingMachine machine) { System.out.println("Coin already inserted. Ready to dispense."); }
@Override public void dispenseItem(VendingMachine machine) { System.out.println("Item dispensed. Thank you!"); machine.setState(new DispensedState()); }}
// Concrete State: Dispensed Stateclass DispensedState implements State { @Override public void insertCoin(VendingMachine machine) { System.out.println("Please wait. Resetting the machine."); }
@Override public void dispenseItem(VendingMachine machine) { System.out.println("Item already dispensed. Insert a new coin."); machine.setState(new NoCoinState()); }}
// Context: Vending Machineclass VendingMachine { private State state;
// Initial state is NoCoinState public VendingMachine() { this.state = new NoCoinState(); }
public void setState(State state) { this.state = state; }
public void insertCoin() { state.insertCoin(this); }
public void dispenseItem() { state.dispenseItem(this); }}
// Client Codepublic class StatePatternExample { public static void main(String[] args) { VendingMachine machine = new VendingMachine();
// Test the vending machine machine.dispenseItem(); // Output: Insert a coin first. machine.insertCoin(); // Output: Coin inserted. Machine is ready to dispense. machine.insertCoin(); // Output: Coin already inserted. Ready to dispense. machine.dispenseItem(); // Output: Item dispensed. Thank you! machine.dispenseItem(); // Output: Item already dispensed. Insert a new coin. machine.insertCoin(); // Output: Please wait. Resetting the machine. }}Command Pattern
Section titled “Command Pattern”TThe Command Pattern is a behavioral design pattern that turns a request into a standalone object containing all the information about the request.
Problem it solves
Section titled “Problem it solves”- Decoupling: The sender of a request is separated from the receiver, making the system more flexible and easier to maintain.
- Flexibility: Commands can be easily added, modified, or removed without affecting the client code.
- Undo/Redo: Commands can be stored and replayed, allowing for undo/redo functionality.
- Logging: Commands can be logged for audit or debugging purposes.
- Asynchronous Processing: Commands can be executed asynchronously, allowing for non-blocking operations.
Example
Section titled “Example”A Simple Remote Control
Let’s model a simple remote control that can control a light. The remote control has a button to turn the light on and a button to turn the light off.
Bad Code (Without Command Pattern)
Section titled “Bad Code (Without Command Pattern)”public class Light { private boolean isOn = false;
public void turnOn() { isOn = true; System.out.println("Light is ON"); }
public void turnOff() { isOn = false; System.out.println("Light is OFF"); }}
public class RemoteControl { private Light light;
public RemoteControl(Light light) { this.light = light; }
public void pressOnButton() { light.turnOn(); }
public void pressOffButton() { light.turnOff(); }
public static void main(String[] args) { Light light = new Light(); RemoteControl remote = new RemoteControl(light);
remote.pressOnButton(); remote.pressOffButton(); }}Problems with the “Bad” Code
Section titled “Problems with the “Bad” Code”- Tight Coupling: The Re5nted to control a different type of device (e.g., a fan), you would need to modify the RemoteControl class.
- Lack of Flexibility: Adding new actions (e.g., dimming the light) would require modifying the RemoteControl class.
- No Undo/Redo: There’s no easy way to implement undo/redo functionality.
- Limited Extensibility: You can’t easily extend the remote to control multiple lights or other devices.
Good Code (With Command Pattern)
Section titled “Good Code (With Command Pattern)”// Command Interfaceinterface Command { void execute(); void undo(); // Optional: For undoable commands}
// Concrete Commandsclass TurnOnLightCommand implements Command { private Light light;
public TurnOnLightCommand(Light light) { this.light = light; }
@Override public void execute() { light.turnOn(); }
@Override public void undo() { light.turnOff(); }}
class TurnOffLightCommand implements Command { private Light light;
public TurnOffLightCommand(Light light) { this.light = light; }
@Override public void execute() { light.turnOff(); }
@Override public void undo() { light.turnOn(); }}
// Receiverpublic class Light { private boolean isOn = false;
public void turnOn() { isOn = true; System.out.println("Light is ON"); }
public void turnOff() { isOn = false; System.out.println("Light is OFF"); }}
// Invokerpublic class RemoteControl { private Command onCommand; private Command offCommand; private Command lastCommand; // For undo
public RemoteControl(Command onCommand, Command offCommand) { this.onCommand = onCommand; this.offCommand = offCommand; this.lastCommand = null; }
public void pressOnButton() { onCommand.execute(); lastCommand = onCommand; }
public void pressOffButton() { offCommand.execute(); lastCommand = offCommand; }
public void pressUndoButton() { if (lastCommand != null) { lastCommand.undo(); lastCommand = null; } }
public static void main(String[] args) { Light light = new Light();
Command turnOnCommand = new TurnOnLightCommand(light); Command turnOffCommand = new TurnOffLightCommand(light);
RemoteControl remote = new RemoteControl(turnOnCommand, turnOffCommand);
remote.pressOnButton(); remote.pressOffButton(); remote.pressUndoButton(); // Turns the light back on }}Explanation of the “Good” Code
Section titled “Explanation of the “Good” Code”- Command Interface: Defines the
execute()andundo()methods that all command objects must implement. Theundo()method is optional but useful for implementing undoable operations. - TurnOnLightCommand and TurnOffLightCommand Classes: These are concrete implementations of the Command interface. Each command encapsulates the action of turning the light on or off, respectively. They hold a reference to the Light object they will control.
- Light Class (Receiver): This is the object that performs the actual action. The commands delegate the execution to the receiver.
- RemoteControl Class (Invoker): This class holds the commands and triggers their execution. It doesn’t need to know anything about the specific commands or the receiver; it simply calls the
execute()method of the command object. The RemoteControl stores the last executed command, enabling theundo()functionality.